Installation

How to Install MailMerge on Your Gmail Account

Get Started

Get Started with MailMerge
Configure Your Spreadsheet and List all Your Recipients?
Import Your Contacts from Google Contacts
How to Add Your Contact List Manually
Create a Simple Draft Email Template in Gmail
Your Dashboard
Receive a Test Email
How Many Emails Can I Send Each Day?

Personalize Your Email

Personalize Your Email Content With Markers
Personalize Your Subject Line for Better Open Rates
Send Multiple Emails with Different Contents in One Campaign
Send a MailMerge with Personalized Attachments to Each Recipient

Email Delivery

What is Spam? How is Your Email Marked as Spam?
Anti-spam Rules
Insert an Unsubscribe Link in Your Email

Track Your Campaign

How to Track and Measure Your Emailing Campaign Results?
How to Track if Your Emails have been Opened?
Definition of Click-Through Rate (CTR)
What are Bounces? Why do I get Bounces?

Premium Features

Premium Subscription

Troubleshooting

Google Blocked my Account. Why and What Should I Do?
Error: 'Server is not Responding / Server Error'
Attachments Issue: 'No documents' in the Drive Folder Selection

Get Started

Get up and running quickly with MailMerge: Usage, daily quota, requirements.

Your First Mail Merge. Configure your spreadsheet and list all your recipients

If you decide to import your contacts from Google Contacts, MailMerge will automatically list all your recipients in your spreadsheet. But if you want to add manually your contact list and other personalized information, here's the right way to do it.

1. Open a Google Sheets

You can either reuse an existing spreadsheet or create a new one. We'll start from a new Google Sheets:

Create A Spreadsheet

2. Add column headers to your spreadsheet

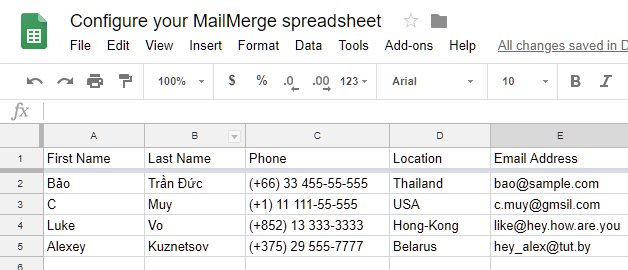
On row 1, type the name of each column (called 'headers') for each information you need for your campaign.

Example:

We want to add the first & last names of our subscribers, their phone, location, and email addresses. We'll write these headers as following:

These headers must ALWAYS stay on the first row. A good habit will be to freeze this row 1 by dragging down the line (located above row '1') to make sure you don't move them accidentally:

3. Add all information under each column

It is now time to fill your spreadsheet with all the information you need, row by row:

4. Start your mail merge

Once your spreadsheet is ready, you can now start your mail merge (after creating a simple draft email template in Gmail for your mail merge).

Click Add-ons > MailMerge > Start email campaign. MailMerge will automatically detect your contact column:

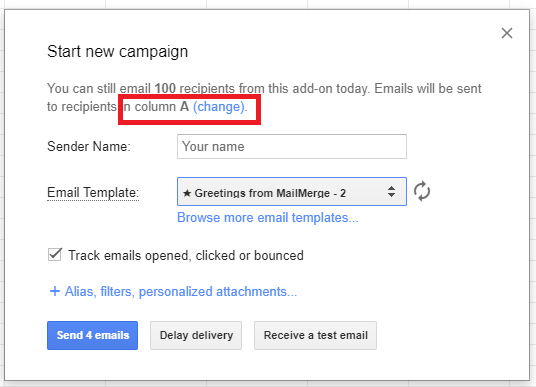
Input appropriate sender's name and select your simple draft email template in Gmail for your mail merge.

Once you're ready, simply hit the 'Send Emails' button to send your mail merge to your recipients:

| | |

© 2025. All Rights Reserved.